Special Notice for European Union (EU) viewers. Due to the GDPR, you are NOT AUTHORIZED to access this website for any purpose whatsoever. Continued use is a violation of US LAW.
See the disclaimer for more information.
|
 It is not uncommon for RV manufacturers to leave out what I believe are essential items; EMS (Electrical Management Systems), Light dimmers for the main Salon and perhaps exterior strip lights, Battery, Solar, and other management panels, and so on. RV manufacturers also rarely take the owner's desire to install these items into consideration when building the RV, so often there is noplace to put these additional items.
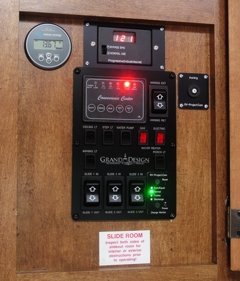
For my RV, the control panel area was starting to get that cluttered look, and I wanted to add a few more items, so it has become time to upgrade the control panel. I wanted to keep the original factory panel, so I am going to replace the cardboard board the panel screws into. I designed a 3mm (approx 1/8") thick panel to go behind the original panel and provide expansion capability. I do have the panel template that you can download, but realize it is for a 2016 Grand Design 29RS, and may not fit other RVs (but feel free to adopt the panel to your needs). I also designed 1.8" x 2.4" sub-panels that fit into the 6 positions on each side of the panel. The top of the panel features a cutout for a Victron BMV-700 Battery Monitor, Progressive Industries EMS control panel, and a Mopeka Tank Monitor
This is not an inexpensive project by any means, costing around $120 for the main panel, and $20~30 for each sub panel. You can however, integrate any sub-panel function into the main panel for a lot less money if you do not require the flexibility of swapping out sub-panels. The panel itself is anodized aluminum, and Front Panel Express offers a brushed anodized version. I did not realize that until ordering my panel, and if I did, I might have ordered that version. I cannot recommend the brushed panel one way or the other as I have not yet seen the result. While I ordered the panel without 4-40threads to save a few dollars, the small taps are a bit hard to use unless you have some skill in using taps. Otherwise, I would recommend ordering the panel with the threaded holes. Also, you can tap the 6-32 holes for the OEM panel instead of using the threaded inserts I used. You can modify the design template by using the Front Panel Express Designer. You can download the panel template from the button below as well as the sub-panel templates from my Templates page, including instructions on how to download, modify, and order them with the Designer. Panel CPU-1 is for the main "skeleton" panel, and CPU-2 is for the blank sub-panels.
The only thing that detracts from the nice new panel is the Mopeka monitor's membrane is not centered propely, making it look a bit crooked. It was not noticeable until I put the monitor into the panel with all of the straight lines as reference. It's just another typical example of the RV industry's low quality workmanship.
Project video.
|