|
|
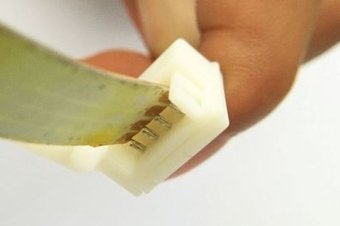
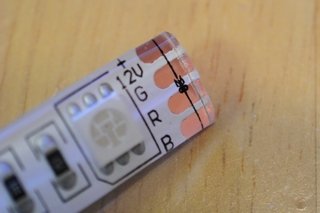
Sooner or later, you will have left over LED strips that you want to use for small projects, or you need to re-terminate the end of the LED strip. Especially for the waterproof LED strips (IP65 and above), they have a waterproofing membrane that does not often result in a satisfactory connection when using the typical insulation displacement splices.
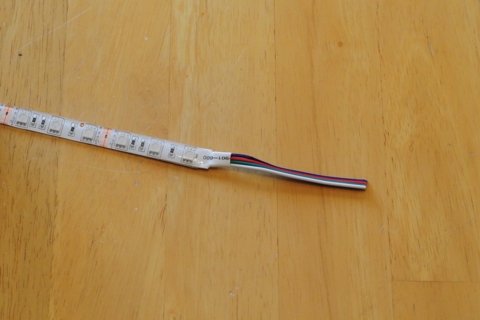
For these jobs, I like to directly solder wires to the LED strip. This results in a more secure connection in my opinion than the typical insulation displacement splice, simply because the membrane gets in the way of a good fit. The connection can then be made waterproof by using Liquid Tape, Heat Shrink, or a combination of the two. Alternatively, Conformal Coatings may be used rather than Liquid Tape, but either will suffice. Not all heat shrink is created equal, so look for the waterproofing type that has an adhesive in the inside.
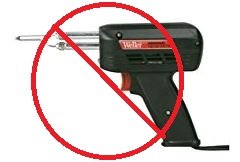
Soldering does require the correct equipment and some experience, so if you have not done this kind of thing before, it does take a bit of practice. The proper soldering pencil is one that produces 25-40Watts of heat, and ideally adjustable. You don't want too hot of an pencil (it will damage the LED strip), or too little heat (you can get a cold-solder joint). Use of a "solder gun" is not appropriate for this task. Several "solder-practice" kits are available that may be helpful in gaining the experience to solder - and usually you get a little electronic trinket when you are done They are inexpensive, and sometimes these kits include a soldering pencil, a few tools, and even a bit of solder.
As well, there are different types of solder. Most solder has a "core" containing flux. This flux assists in cleaning of the solder joint, which provides a better result. If it is intended for electrical/electronic work, it will have a rosin core. However, other solders having an acid-core that are intended for soldering copper pipes in homebuilding are not appropriate for electronic work as they will eventually corrode the wiring. You will also want a small diameter solder for precision application. The solder I use is 0.031 (0.8mm) dia, has a 2% rosin flux core, and is 99% Tin, 0.3% Silver and 0.7% Copper. This is common for the electronic industry and has a good balance of melting threshold, corrosion resistance, and bonding properties.
The old standby electronic solder, called 60-40 is still available and will work equally as well. It is 60% Tin and 40% lead, and due to the lead content, it is no longer recommended. Try to use Sn99/Ag0.3/Cu0.7 with Rosin core solder if possible.
"How To" video.
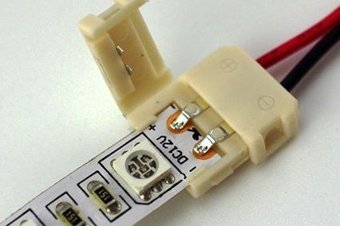
While I don't generally recommend them, sometimes you have no choice but use them. Their application would be when there is stress on the connection that could cause the wires to pull out of the tabs. If you decide you need to use them, realize there are several different types that are commonly available:
Also, the waterproof type have a larger opening to allow for the silicone waterproof jacket typically found on the waterproof strips. In addition you will find these connectors in 2 wire (monochrome), 4 wire (RGB) and 5 wire (RGB+W) strips.
If you have to use these connectors, make sure you obtain the correct version for your LED strip. Strips used for waterproof LEDs are insulation displacement - sometimes called a "vampire" tap. The installation procedure is to insert the LED strip into the open end of the connector - close the cover - then squeeze tight with a pair of pliers, hammer, etc. The prongs of the strip should pierce the bottom of the LED strip, making contact with the copper pads.
Finally, waterproof the connection with either a dab of "Liquid Tape" or heat shrink.
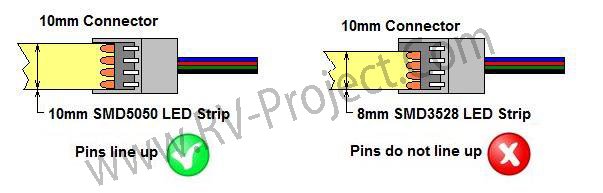 Be sure to match the connector width with the LED strip.
|

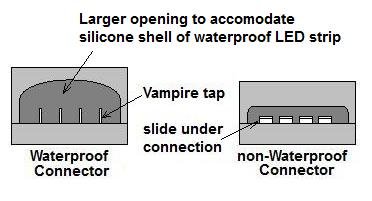 The 8mm connectors are typically used for SMD3528 LED strips while the 10mm connectors are used for the wider SMD5050 strips. You must use the correct stip (8mm for 3528 or 10mm for 5050) or the pins will not line up correctly.