Notice: Click on the Disclaimer button prior to taking any action shown on this website.
SPECIAL NOTICE TO EUROPEAN UNION (EU) VIEWERS
This site may use cookies for delivering advertisements, and is not intended for use by subjects of the EU. Continued use of this site is acknowledgement of your compliance with all EU laws, and accepting full responsibility for any and all actions related to accessing this website, including (but not limited to) agreement to the use of cookies.
The RV-Project.Com 3D RV Parts Page.
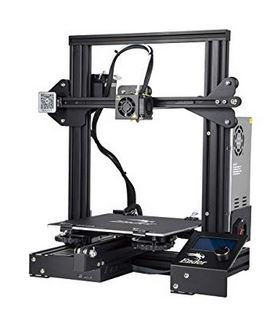
$250 Creality Ender 3 Pro Printer
Did you know you do not need a 3D printer to make these parts?
I use the inexpensive Ender 3 as shown above, but you do not even need to buy a 3D printer.
Many 3D Printing services exist, both professional and amateur that will create a part for you. All you need is to submit a ".STL" file, which I provide on this webpage.
The cost and quality of this service varies depending on the printing service you chose. For hobbyist printing services, eBay is a good source, and they list over 250 printing services. As well, 3D part repositories such as ThingiVerse have various apps that provide printing services.
Pricing for printing services varies significantly; some charge by the part, some by the print time, and whether you ask for added services such as design services.
I am listing the printing services as a convenience only, and do not provide any recommendation or have verified the legitimacy of any printing service's quality of work.
3D Printing Services (eBay)
Microsoft Edge users:
If you are using Microsoft Edge, be aware that it might change the front panel template extension from ".stl" to ".txt" when you attempt to download it. As a result, you may see a bunch of text characters on screen.
To download the template, save (or save as) to your computer as a .txt file. You will then have to rename the extension of the ".txt" file to ".fpd" (for example rename "template.txt" to "template.fpd").
There is probably a way to make this not happen, but I don't use Microsoft Edge; Firefox and Chrome both work.
If you cannot get the above procedure to work, you will have to call Microsoft as I don't provide support for Microsoft products. Or, you could always use a browser that does work.
These are prototype parts:
While every effort has been made to ensure the accuracy of the dimensions in these panels, mistakes can be made. By downloading these designs, you are acknowledging that you are using them as is, and you will double-check all dimensions to ensure their accuracy.<
Using the files. All files are created in .STL format, unless otherwise specified. The STL format is a CAD (Computer Aided Design) vector format, and is used by popular slicers, such as Cura and others (check with your 3D printer to ensure you have a STL compatible slicer).
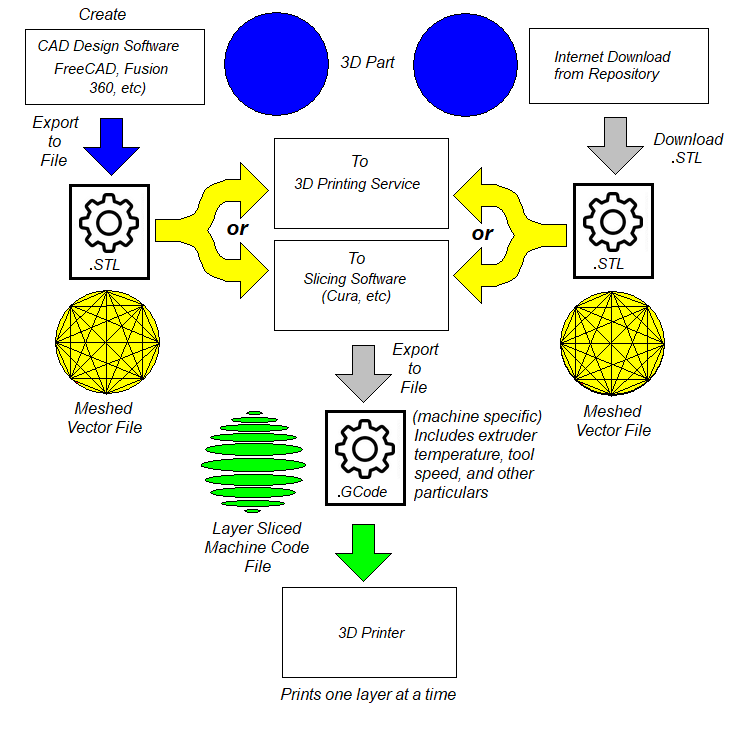
General workflow.
The workflow for creating projects with 3D printed objects depends on how you obtain the object and how you print it out.
Do everything yourself:
Create your own parts using CAD software (I use FreeCAD).
Save the CAD drawing as a .STL file (Stereo Lithography),
Convert STL file into GCode (CNC instructions) with your slicer software (typically incuded with your 3D Printer).
Load the GCode into the 3D printer and print.
Download the part from an on-line repository (i.e. ThingiVerse).
Download the Zip file package.
Uncompress the Zip formatted package into the individual files (STL and Documentation).
Convert the part with your slicer software to GCode.
Load the GCode into the printer and print.
Create parts from RV-Project.Com templates.
Download the .STL file.
Convert the file to GCode with your slicer software.
Load the GCode into the printer and print.
Sending your own object or downloaded object to a 3D Printing service.
Obtain the .STL file by one of the methods above (Create yourself with CAD software, or download)
Send file to print house. They will convert the STL file to the GCode appropriate for their printer.
What the CAD software does.
The CAD (Computer Aided Design) allows you to create the part. This can be quite challenging for first-timers, and there is typically a learning curve. The good news is you do not have to use a CAD software to print any of the parts cataloged below. CAD is only required if you want to design your own parts.
There are many tutorials on Youtube that can help you to learn CAD. FreeCAD is a public domain (Free) CAD, and has a lot of support. However, there are a few quirks that can be frustated until you figure everything out. And chances are that the on-line tutorials are one or two software versions old, which can be frustrating as well.
Commercial software is typically very expensive, costing many thousands of dollars in some cases. However, Fusion 360 by AutoDesk is free for Hobbyists and small businesses.
CAD software is usually printer independant and can be used with 3D printers, CNC machines, and a whole host of other devices.
What the Slicer software does.
The slicer software is the interface between your CAD design and printer. It provides the machine code instructions (GCode) that give specific tasks to the machine such as cut here, drill there, and so on. These days, many 3D Printers come with CURA slicing software, however some properitary 3D printers may have their own. The more popular 3D printers will already have a setting in the slicing software.
The software is called a slicer since it breaks down the part into individual layers, some as tiny as 0.1mm thick. It is these layers that the 3D printer prints - one at a time - building one layer on top of the other.
The slicing software is also responsible for setting the parameters of the 3D printer, including temperature of the extruder and bed, feed rate, print boundaries, and many other parameters. For this reason alone, setting up the print may be a challenge, especially since different brands and types of filaments have their preferred extruder temperature and feed rates. The quality of your print primarily depends on your 3D printer quality and proper setup of the slicer software. Simplify 3D slicer software is one of the best when you are ready to go beyond Cura, but it does cost $150.
This catalog is a repository for the 3D CAD designs that I have used in my projects, or links to websites having designs others have created. The designs I provide are free. You will have to consult with the owner of the linked designs as I have no control over those (I am just providing the link). If you see a "DOWNLOAD" button associated with the part, is a RV-Project.Com design. If you see a "LINK" button, it is a link to a website having a design others have created.
Lippert Remote Transmitter Holder
Designer: RV-Project.Com
Project: Video Filament: eSun PLA Pro+
Temperature: 210° C
Slicer Notes:
This is a holder designed to hold the Lippert wireless remote transmitter for the Ground Control and Linc systems.
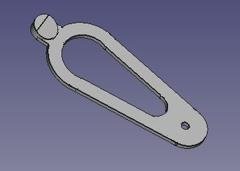
Water Inlet Wrench
Source: ThingiVerse.Com
Project: Video Filament: Creality PLA
Temperature: 200° C
Slicer Notes:
From ThingiVerse, this nifty water inlet wrench is just the thing for getting those hoses off.
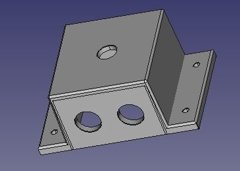
Camera Housing (Furrion Vision)
Designer: RV-Project.Com
Project: Video Filament: Hatchbox PLA
Temperature: 200° C
Slicer Notes:
This is the camera housing used in the Hitch-Cam project.
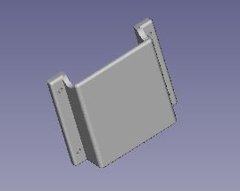
Camera Mounting Bracket (Furrion Vision)
Designer: RV-Project.Com
Project: Video Filament: Hatchbox PLA
Temperature: 200° C
Slicer Notes:
This is the camera bracket used in the Hitch-Cam project.
Switch Housing
Designer: RV-Project.Com
Project: Video Filament: eSun PLA Pro +
Temperature: 210° C
Slicer Notes:
This is the single PG-9 gland version of the switch housing, intended for 12mm (1/2") dia shaft toggle switches.
Switch Housing
Designer: RV-Project.Com
Project:
Filament: eSun PLA Pro +
Temperature: 210° C
Slicer Notes:
This is the two PG-9 gland version of the switch housing, intended for 12mm (1/2") dia shaft toggle switches.
Fused Switch Housing
Designer: RV-Project.Com
Project: Video Filament: eSun PLA Pro +
Temperature: 210° C
Slicer Notes:
This is a combo switch housing and opening for a Littlefuse 01550430ZXU ATC panel mount fuseholder, intended for 12mm (1/2") dia shaft toggle switches.
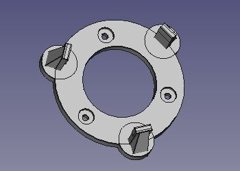
Awning Corner Bracket
Designer: RV-Project.Com
Project: Video Filament: Solutech PLA
Temperature: 200° C
Slicer Notes: 30% infill.
These are the corner brackets for the awning. Make four. Specify 30% fill at minimum for strength.
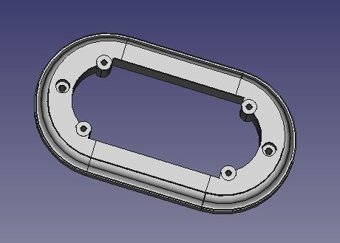
Awning Center Spyder
Designer: RV-Project.Com
Project: Video Filament: Solutech PLA
Temperature: 200° C
Slicer Notes: 30% infill.
This is the center support spyder. Specify 30% fill at minimum for strength.
This is a replacement door security strap for popular glass doors found in RVs. It uses flexible TPU. Specify 100% infill for a completely solid part. TPU being flexible can jamb in the extruder, especially with the Bowden Tube type printers. This can be alleviated somewhat by reducing the feed rate to 20mm/sec and using 235° C as the hot end temperature.
If you use NinjaFlex, it will come with a sheet of recommended settings. Even then, I had jambs that ruined 33% of the attempts. You can also purchase small amounts of NinjaFlex, enough to make several straps.
From ThingiVerse, this is just the thing to open the overhead vents in your RV. I used a Valterra dump handle extension for the shaft (you will also need a headless 1/4-20 threaded rod).
From ThingiVerse, this is an adapter for a rotary dimmer control for many RV control panels, such as those made by Grand Design, Puma, and others. You will want the long shaft dimmer: